When you’re designing an ecommerce store that needs to convert visitors into buyers, checkout flow is one of the biggest levers you can pull. If your checkout is clunky, slow, or complicated — you’re bleeding money.
That’s where Shop Pay comes in.
Shop Pay is Shopify’s built-in accelerated checkout. It helps returning customers complete their purchases faster by saving their shipping, billing, and payment info. This reduces friction, improves mobile performance, and leads to higher conversion rates.
For Shopify stores — and especially the stores featured on ecomm.design — Shop Pay is more than just a “nice to have.” It’s become the default experience powering millions of checkouts across the web.
Let’s break down exactly what it is, how it works, why it matters for design and UX, and how to get it set up correctly.
What is Shop Pay?
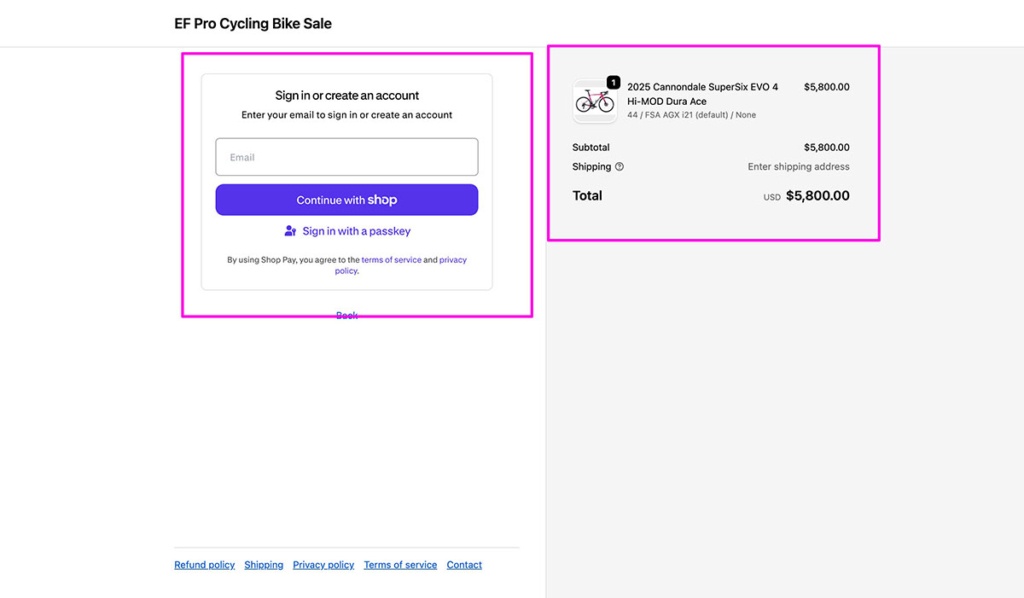
Shop Pay is Shopify’s proprietary accelerated checkout. It allows customers to save their shipping and payment details across Shopify stores, so they can check out in just a few taps on future purchases.
This applies whether they’re buying on a desktop or mobile device.
Key features of Shop Pay include:
- Pre-filled checkout fields: Returning customers don’t need to re-enter their address or card information
- Fast load times: Checkout loads faster and reduces friction during the final conversion step
- One-tap purchase flow: Especially optimized for mobile
- Secure encryption: All stored information is protected through PCI-compliant encryption
- Carbon offsetting: All orders placed through Shop Pay have their shipping emissions automatically offset by Shopify
Shop Pay works across all Shopify stores that have Shopify Payments enabled, and it’s now also available for certain external platforms like Facebook and Instagram Shops.
How is Shop Pay different from a normal checkout?
Unlike the default multi-step checkout process, Shop Pay compresses everything into a quick and seamless flow, especially for returning customers. Here’s a breakdown:
| Feature | Standard Checkout | Shop Pay |
|---|---|---|
| Guest checkout | Yes | No |
| Requires account creation | Optional | No |
| Pre-filled info | No | Yes |
| Speed | Slower | Faster |
| Carbon offsets | No | Yes |
| Installments | No | Yes |
| Branded UI | No | Yes (Purple “Shop Pay” button) |
This isn’t just a branding change — it has measurable impact on performance and conversion.
How Shop Pay Improves Conversion and UX
According to Shopify, merchants using Shop Pay have seen up to 1.72x higher conversion rates compared to standard checkouts. This isn’t just fluff — it’s backed by user behavior and A/B testing across thousands of stores.
Why Shop Pay improves performance:
- Fewer form fields: Pre-filled addresses and payment info reduce friction
- Optimized for mobile: One-tap checkout keeps users from bouncing
- Trust and credibility: Customers recognize the Shop Pay brand and feel more secure
- Speed: The faster someone checks out, the less time they have to second guess the purchase
Specific metrics (Shopify-reported):
- 60%+ of Shop Pay checkouts are completed in under 1 minute
- Cart abandonment drops by up to 18% when Shop Pay is activated
- Shop Pay is 70% faster than manual checkout on mobile
- Mobile conversion is 4x higher with Shop Pay active
In a design sense, Shop Pay removes the need for users to think. That’s the cornerstone of any great UX.
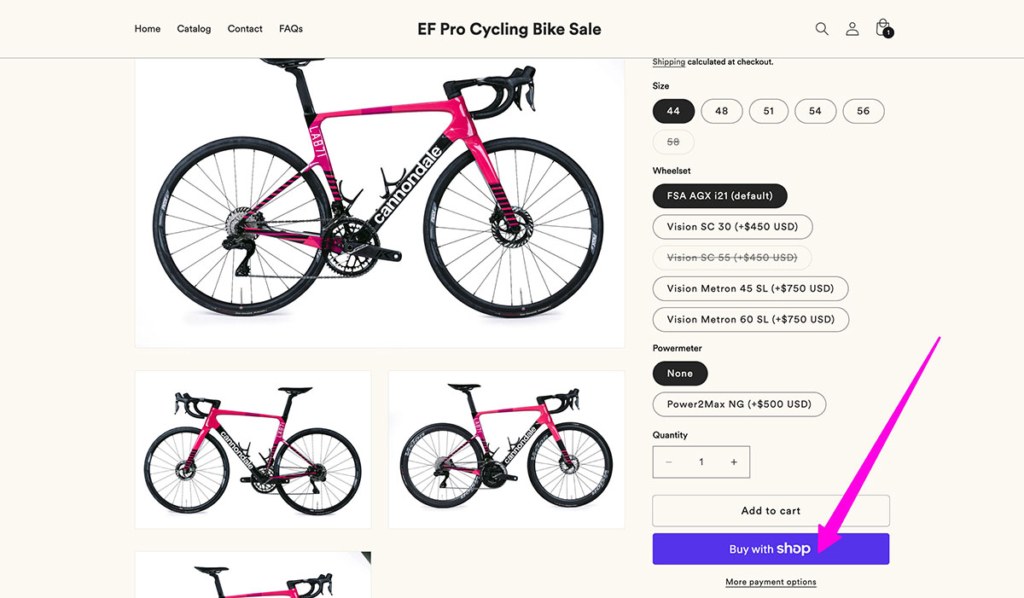
You’ll notice many stores featured in the ecomm.design gallery already use Shop Pay. It’s prominently featured on product pages and cart pages with its recognizable purple button.
What is the Shop App?
Alongside Shop Pay, Shopify has developed the Shop App, a free mobile app that provides shoppers with a way to track orders, discover new brands, and re-order products with one tap.
The Shop App is directly integrated with Shop Pay and Shopify Payments, which means your store is automatically added if you meet the eligibility requirements.
Key features of the Shop App:
- Real-time order tracking: Branded shipping updates
- Product discovery: Users can browse stores they’ve shopped at
- Saved payment methods: One-click checkout via Shop Pay
- Re-order functionality: Easy repeat purchases
- Support for local businesses: Filters for “Shop Local” features
Why this matters for ecommerce stores:
For designers and ecommerce managers, the Shop App creates a post-purchase experience that helps drive brand loyalty.
You’re no longer relying solely on emails or retargeting ads to bring back customers. Shopify does it for you inside the app.
You also get exposure to a user base of over 430 million customers who already use Shop Pay and Shop App.
Shop Pay vs Shopify Payments: Know the Difference
Many people confuse Shop Pay and Shopify Payments — but they’re two very different parts of the checkout stack.
Let’s break it down clearly:
| Feature | Shop Pay | Shopify Payments |
|---|---|---|
| Type | Checkout UI | Payment gateway |
| Who uses it | Shoppers | Store owners |
| Main function | Speeds up checkout | Processes card payments |
| Visible to shoppers? | Yes | No |
| Stores personal info? | Yes | No |
| Powered by | Shopify | Stripe (backend) |
| Includes installments | Yes (via Affirm) | No |
Summary:
- Shopify Payments is the infrastructure. It’s what actually processes the transaction.
- Shop Pay is the frontend checkout experience. It makes the transaction faster and smoother.
To use Shop Pay, you must first have Shopify Payments enabled. You can’t use one without the other.
If you’re working with a client on a Shopify store and they ask for Shop Pay, start by ensuring Shopify Payments is properly configured.
How to Set Up Shop Pay on Your Shopify Store
Enabling Shop Pay is one of the fastest ways to improve your store’s checkout experience — but there are a few key things you need to set up first. Most importantly, your store must be using Shopify Payments, which is Shopify’s native payment gateway.
Without Shopify Payments active, Shop Pay won’t be available, even if you’re on the Shopify platform.
Once that’s confirmed, here’s how to fully set up Shop Pay — step by step, with everything explained.w
Step-by-Step Setup Instructions (With Explanations)
1. Log into your Shopify Admin
Start by logging into the Shopify admin dashboard of the store you want to configure. This is your central control panel for managing payments, orders, products, and settings.
2. Click on Settings
From the bottom-left corner of your admin, click Settings to access all the backend configuration options. Payments are managed here, along with checkout preferences, shipping, and policies.
3. Navigate to the Payments section
In the settings menu, click on Payments. This is where you manage all payment providers — Shopify Payments, third-party gateways like PayPal or Amazon Pay, and accelerated checkout options like Shop Pay and Apple Pay.
4. Under Shopify Payments, click Manage
If Shopify Payments is already enabled, you’ll see a section labeled Shopify Payments. Click Manage to access additional options and accelerated checkout settings.
If it’s not enabled yet, you’ll need to complete Shopify’s identity verification process first. This usually includes entering your business details, bank account information, and tax information for compliance.
5. Scroll to the Accelerated Checkouts section
Once inside the Shopify Payments settings, scroll down until you see the Accelerated Checkouts section. This is where you’ll find options to toggle on Shop Pay, Apple Pay, and other fast checkout tools.
6. Enable Shop Pay
Check the box next to Shop Pay. This activates it across your store’s checkout pages, allowing returning customers to use saved information for a faster experience.
Shopify will automatically generate the purple Shop Pay button on:
- The product page (if Buy Now is active)
- The cart page
- The standard checkout screen
No coding required.
7. (Optional) Enable Shop Pay Installments
If you’re a US-based store using Shopify Payments, you’ll also see the option to enable Shop Pay Installments, powered by Affirm. This allows your customers to split purchases between $50 and $17,500 into smaller payments.
You can choose whether to allow:
- 4 biweekly interest-free payments, or
- Longer-term monthly financing (interest applies)
This option helps increase your average order value and reduces sticker shock for bigger purchases.
8. Click Save
Once you’ve made your selections, don’t forget to click Save. This confirms your settings and immediately activates Shop Pay on your live store.
What Happens After Enabling Shop Pay?
Once Shop Pay is active, your store gains access to a much faster and more seamless checkout experience. Here’s what changes on the front and back end:
- Shop Pay button appears automatically
Customers will see the branded Shop Pay button across your product, cart, and checkout pages. The button is styled consistently with Shopify’s UI, and no design work is needed on your end unless you want to customize it. - Pre-filled checkout details for returning customers
Shoppers who’ve used Shop Pay before (on your store or any other Shopify store) will see their shipping address, billing info, and payment details already filled in. This removes friction and speeds up checkout dramatically. - Increased conversion performance
With faster checkout and fewer form fields, stores using Shop Pay consistently see a boost in conversions — especially on mobile, where users are more likely to abandon slow or complex checkouts. - Automatic eligibility for the Shop App
Once Shop Pay is turned on, your store is listed in the Shop App, a free mobile app by Shopify that allows customers to track orders, re-order, and discover products from stores they’ve shopped at. You don’t need to submit anything — the integration happens automatically.
Need to Customize How Shop Pay Appears?
For most stores, the default Shop Pay setup is optimal, but if you want more control, Shopify allows you to customize the button placement, styling, or labels via Shopify’s theme settings or custom Liquid code.
Keep in mind:
- You can choose whether to show the Shop Pay button on the product page, cart, or both
- You can adjust the layout to prioritize it over other payment buttons (like PayPal or Apple Pay)
This is especially useful for designers and developers working on custom themes or bespoke ecommerce experiences.
Shop Pay Installments: A Bonus Conversion Tool
Shop Pay also includes an integrated financing option called Shop Pay Installments, powered by Affirm.
This allows customers to split their payments into:
- 4 biweekly payments (no interest or fees)
- Monthly payments for larger purchases (with interest)
Eligibility:
- Available to US-based stores
- Purchase value between $50 and $17,500 USD
- Must have Shopify Payments + Shop Pay enabled
Why use Installments?
- Increases average order value (AOV)
- Makes high-ticket items more accessible
- Adds flexibility without third-party plugins
- Keeps customers on-site during checkout
According to Shopify, merchants using Shop Pay Installments saw AOV increase by 50% or more during early testing.
It’s a simple, built-in feature that can dramatically impact revenue — especially for apparel, tech, and lifestyle brands.
Why Most Stores on ecomm.design Use Shop Pay
If you browse through the ecomm.design gallery, you’ll see Shop Pay in use on the majority of featured Shopify stores.
Why?
Because these stores are built by expert designers who optimize for:
- Fast checkouts
- High trust
- Smooth mobile UX
- Reduced drop-off rates
From bold DTC brands like Allbirds to artisan labels like Jungmaven, Shop Pay is the standard for accelerated checkout.
It’s not just about the button — it’s a signal to customers that this store is professional, secure, and optimized.
And with the added benefits of:
- Carbon offsetting
- Financing options
- Mobile tracking via Shop App
…it adds serious value to both the shopper and the merchant.
Final Thoughts: Should You Use Shop Pay?
If you’re building, managing, or designing a Shopify store, Shop Pay is an easy win. It’s built-in, free to enable, and proven to increase conversions — especially on mobile.
The more stores use Shop Pay, the more seamless it becomes for every Shopify customer, since their details are saved across all stores that support it.
Shop Pay is a fast checkout tool for customers. Shopify Payments is the gateway that processes payments. You need Shopify Payments enabled to use Shop Pay, but they serve different roles.
Yes. Shop Pay only works if your store has Shopify Payments enabled. It won’t appear if you’re using only third-party gateways like PayPal or Authorize.net.
Yes, Shop Pay is fully PCI-compliant and uses encryption to protect payment and personal data. It’s backed by Shopify’s secure infrastructure.
Yes. Once a shopper uses Shop Pay, their info is saved and auto-fills at checkout on any Shopify store that supports it, speeding up future purchases.
Shop Pay Installments let US customers split purchases from $50 to $17,500 into 4 biweekly payments or monthly plans with Affirm.
Yes. Returning customers can check out in one click using their saved info, especially on mobile. It’s one of the fastest options available.
Go to Settings > Payments > Manage. Under Accelerated Checkouts, check or uncheck Shop Pay, then save your changes.
Yes. You can choose where it shows (product/cart page) and style it with theme settings or custom code for layout changes.
The Shop App lets customers track orders, re-order, and discover stores. If you use Shop Pay, your store is automatically listed.
Currently, Shop Pay doesn’t support most subscription checkouts. Compatibility depends on the subscription app used with Shopify.


